Drive Issues
Description
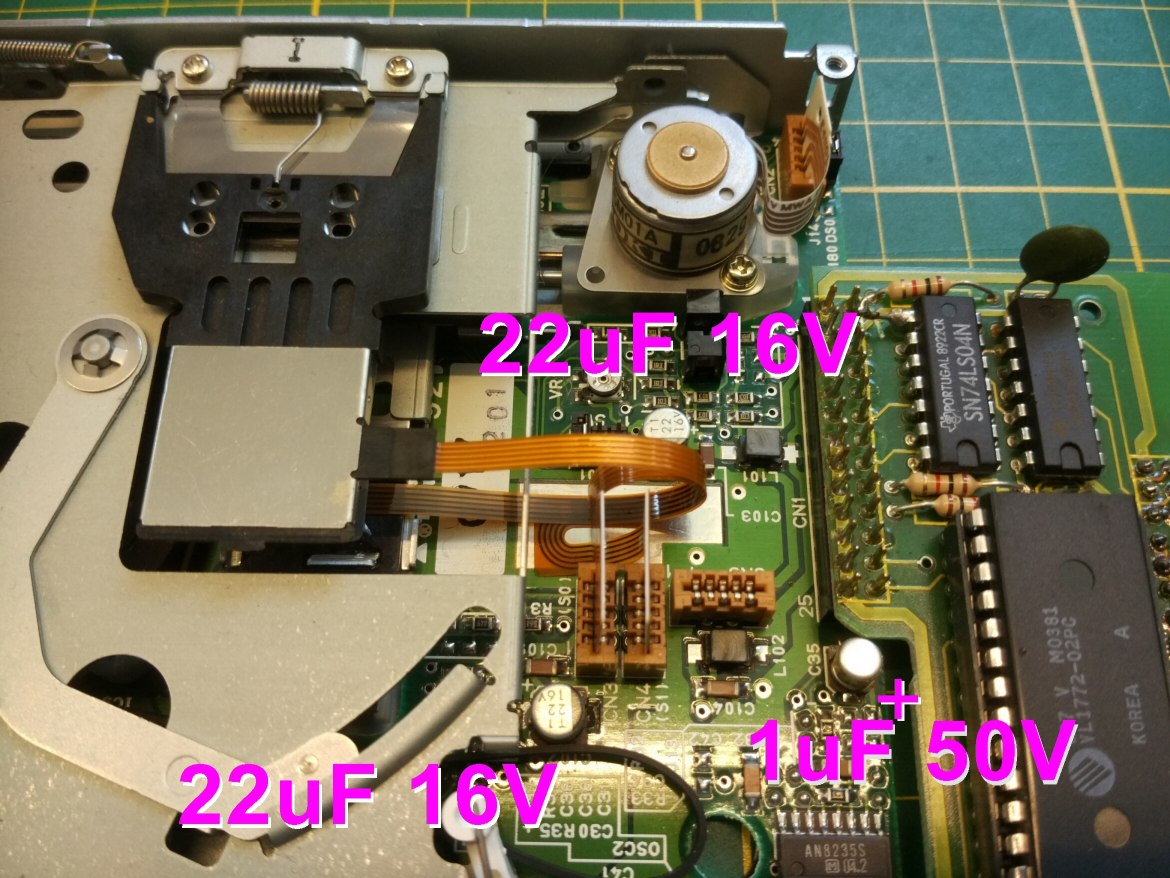
Drive Capacitors:
With age the surface mount capacitors on the U0DC-xxx Citizen Sam Drive will have already start leaking causing the drive to eventually fail to boot/read/write/format.
As with all capacitor leaks it is essential that the units are replaced and the corrosive electrolyte is removed before it damages the PCB.
Capacitor replacement in these models this therefore mandatory, a list of capacitors is available on the Replacement Parts List page along with link to Ben Versteeg's blog with details.
Thankfully the capacitors can be removed without having to fully dissasemble the drive, just remember to protect the other parts of the drive from heat when removing/refitting.
Mark Payne has a good video showing the steps needed on YouTube.
Quazar or Mutant Caterpillar Games can help with that if you're not keen on soldering surface mount components.
Drive Heads:
Drive heads can become clogged with debris from either the environment or from the surface of degraded floppy disks.
For all drive types, open the case and clean the drive heads using isopropyl alcohol and a foam/chamois bud (not cotton).
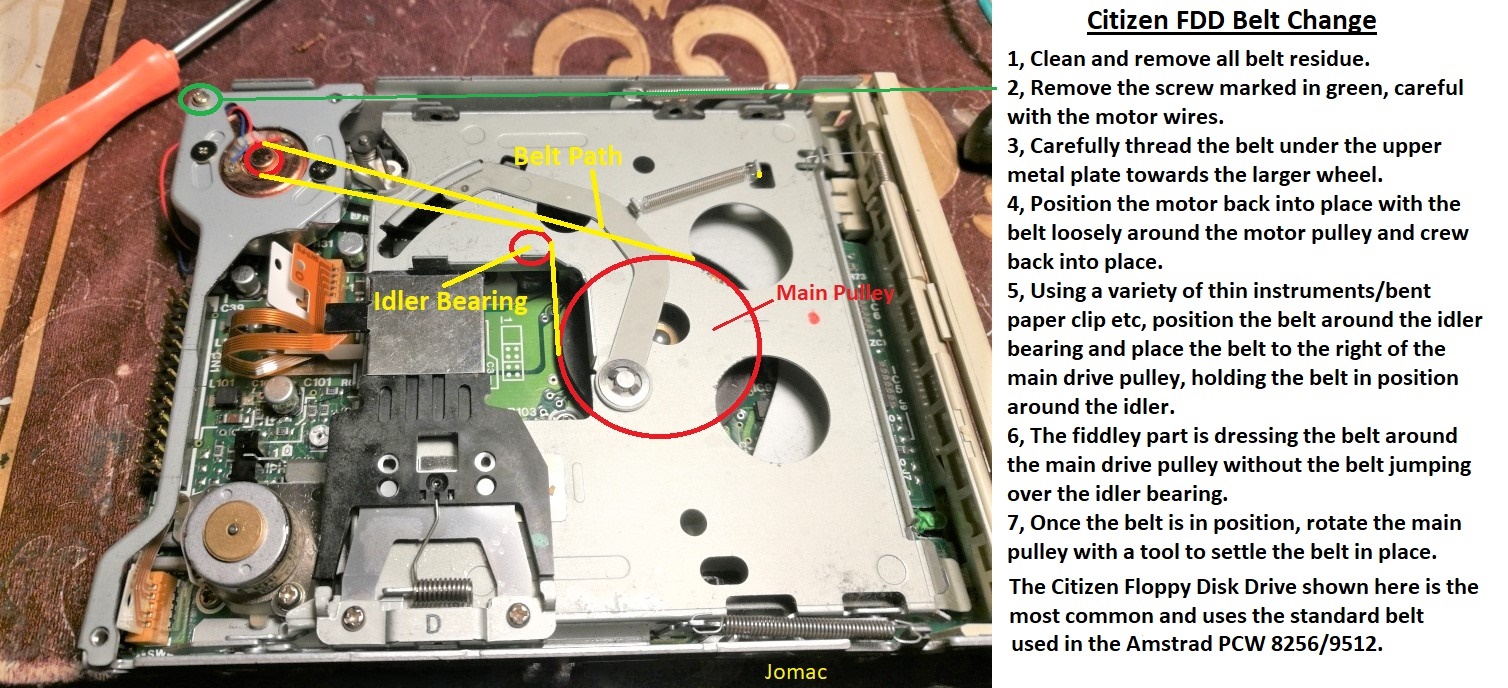
Drive Belt:
With age the drive belt in Citizen and NEC drives can stretch, break or even turn into a gelatinous mess depending on it’s composition.
Depending on the exact model of drive one of the three belts below are required - see Tips section below.
AVBELT4 - Flat Section Drive Belt 69.0 x 3.0 x 0.6mm Rubber
AVBELT5 - Flat Section Drive Belt 71.0 x 2.8 x 0.6mm Rubber
AVBELT6 - Flat Section Drive Belt 72.0 x 3.5 x 0.5mm Rubber
To replace the belt you must remove the drive from its plastic shell, unscrew the metal shield and the motor bracket to get access to the drive flywheel.
Clean the drive thoroughly to remove dust and fluff from the unit, clean the edges of the flywheel, jockey wheel and the motor spindle with a suitable cleaner such as isopropyl alcohol on a cotton bud - also check the drive head worm gear for fluff build up and re-grease if required.
Take the opportunity to clean the drive heads using isopropyl alcohol and clean the skid plate under the head assembly.
Fitting the belt can be done as demonstrated here and here but it can be done without having to remove the drive cage if you have two pairs of tweezers to hold the belt:
With the drive slot facing you:
- As above post cleaning with the top and bottom sheilds removed and the motor assembly popped out.
- Place the new belt around the flywheel.
- Using one pair of tweezers grip the belt about 10mm from the loose end so that it forms a small loop and bring the left side of the belt around the outside and under the silver jockey wheel and to the right hand side towards the right of the post so that they come almost together.
- Bring the loop to the hole below where the motor spindle sits.
- Bring the other pair of tweezers up through the hole and grip the belt loop and release the first pair of tweezers.
- Whilst holding the loop from the bottom, drop the motor back into position, guiding the motors pulley through the loop you are holding, push the loop up as you bring the motor down and it should hook on.
- Screw the motor assembly back down.
Alternatively see the picture below by John Lannigan from the AMSTRAD 8BIT COMPUTERS (PCW8256/8512) & CPC-464/664/6128 Etc.Group.
Drive Covers:
These can be 3D printed for either a 3.5" standard PC drive or a blanking plate see https://www.thingiverse.com/thing:873336/files
Screenshots

Tips
Some great advice from Ian Gledhill of Mutant Caterpillar Games:
Belts in a Sam drive are not as simple as "does this work".
There are three types of Citizen drive I've come across.
The first and most common one is the blue eject button with the motor soldered to the PCB. This type can usually use an AVBELT5 from CPC, which is your +3 belt. These use a 2.2uF bi-polar capacitor.
The second most common is the black eject button with the motor connected via a ribbon. This is very similar (but not identical) to the third most common, blue eject with a ribboned motor. These use a 1uF bipolar capacitor which can be very hard to find an exact replacement. A ceramic may work, but I've not tried it. These drives can use anything between AVBELT4 (smaller, therefore more tension but can slow the motor) to AVBELT6 (larger, therefore less tension and less torque, but more motor speed because of the less strain).
To fix a Sam drive you need:
- AVBELT4, AVBELT5 and AVBELT6.
- A correct set of capacitors.
- Isopropyl Alcohol and cotton buds.
- A set of test disks of various looseness (some disks need a tighter belt if they're more resistant to spinning).
- At least one game disk which uses both heads (Prince Of Persia and Lemmings are good for this)
- One or preferably two blank disks.
- A Boot disk for the Format command.
You MUST recap the drive. It's not optional. Do it now before the leakage damages the PCB.
Be prepared to realign the head chassis by loosening the seek motor and twisting it slightly but only if really needed. If it formats but doesn't load a good disk, this is why.
If it can't format a known good disk, try another belt.
It can also help to remove the little metal wheel on the belt, clean it and the spindle, and then put it back.
If it starts loading a game but fails part way through, you may need to realign the upper head only. This can take hours! Only do this if you're sure you need to. You do it by loosening the screws fixing the upper head to the head chassis.
Fixing a Sam drive can be easy (recap, belt change, clean heads, play Lemmings) but I would say about 50-60% need more work than that, at least in my experience (though this may be skewed because people don't send in working drives for repair!). It can be a very long and involved process. Here's hoping yours just needs a belt change and a recap (don't forget the recap is NOT optional).